Reset ASUS Motherboard BIOS: Easy Steps to Restore Stability with Precision
Reset ASUS Motherboard BIOS: Easy Steps to Restore Stability with Precision
When your ASUS motherboard suddenly crashes, boots erratically, or freezes despite working components, the root cause often lies in corrupted BIOS settings—errant parameters, unregistered drivers, or unintended updates. Resetting the BIOS is not a last resort but a targeted reset that recalibrates firmware and restores default configurations safely and efficiently. For ASUS users, mastering the Reset ASUS Motherboard BIOS isn’t daunting—just a series of deliberate, documented steps that deliver reliable results.
The BIOS, a foundational layer of your system, governs hardware initialization, boot sequencing, and core security settings. Over time, manual tweaks, power failures, or software conflicts can compromise its integrity. Optimizing this interface isn’t merely about restarting; it’s about restoring digital harmony between hardware and firmware.
ASUS provides multiple methods to reset the BIOS, ranging from BIOS-RESET jumper settings to firmware resets via UEFI/BIOS interfaces—all designed for user-accessible simplicity.
Why Reset ASUS BIOS? Common Triggers and Risks
BIOS corruption or misconfiguration can manifest in numerous ways: missing device recognition, boot loops, unexpected BIOS APOMM masters—erratic updates, or even unauthorized BIOS flashing.These errors disrupt system stability and threaten long-term component health. While flashing or reprogramming offers deep fixes, a traditional reset is often sufficient. It clears stray settings without altering user data or recovering legitimate firmware versions.
“Resetting the BIOS is like rebooting a system’s soul,” explains one ASUS technical specialist. “It removes soft errors, restores baseline functionality, and eliminates ghost configurations born from human or environmental errors.” ASCII-marked tuning ensures compatibility across hardware generations. Key triggers demanding BIOS reset: - Unstable POST sequences - Barriers to booting legacy hardware - Inconsistent power management settings - Conflict after system updates or overclocking Avoiding implicit assumptions—such as assuming “safe” boot means “least interference”—is critical.
A structured reset respects both system integrity and user intent.
Method One: The Classic BIOS-RESET Jumper Trick
For many users, especially those with ATX motherboards, the physical BIOS-RESET jumper remains the fastest and most dependable method. This discreet switch, typically located near the CMOS battery, forces the BIOS to load default settings without navigating firmware menus.- Power down the system and unplug all peripherals.
- Locate the BIOS-RESET jumper—often labeled on the motherboard or in the manual under “CMOS Reset.”
- Set the jumper to “T6” or “Reset”—this overrides any current BIOS settings instantly.
- Wait 30 seconds before powering on; the system will now initialize with factory defaults.
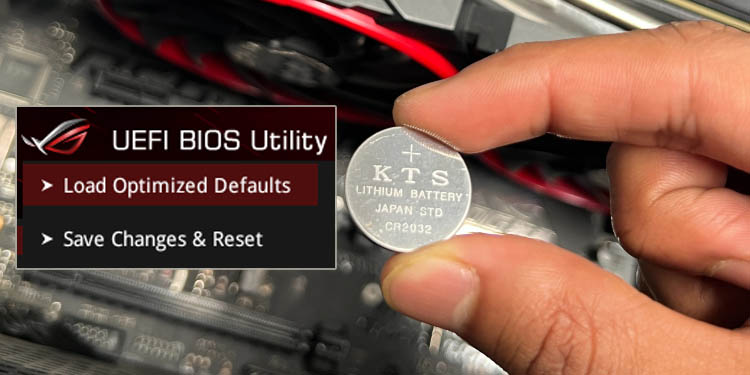
Method Two: Resetting via UEFI/BIOS Setup Interface
For advanced users, the ASUS UEFI/BIOS interface offers granular control.Resetting through this DCUI (Desktop Configuration Utility) allows verifying digital integrity alongside reset actions.
- Restart the system and enter BIOS by pressing F2, Del, or F10 during boot.
- Navigate to “System Reset” or “BIOS Settings” menu—location varies slightly by model.
- Select “Load Default Settings” or “Reset to Factory Defaults.”
- Confirm with “RESTORE” and power on; the interface will erase user-adjusted parameters and reset core clock, voltage, and security settings to factory norms. This approach preserves hardware-specific configurations while eliminating user-triggered errors—ideal for troubleshooting boot variables or firmware mismatches.
- Download and install ASUS Fujisan Utility from the official support portal.
- Boot into UEFI without flashing—sometimes power cycling after firmware check facilitates clean reset.
- Within Fujisan, locate “System Management” or “Boot Options.”
- Look for a “Reset to Default” or “Boot Settings” button to restore BIOS defaults post-update. This method suits users managing BIOS across multiple motherboards or engaging in system upgrades. It ensures configuration consistency while mitigating human error.
Method Three: Firmware Reset via ASUS Fujisan UEFI
For those comfortable with firmware-level tools, ASUS Fujisan’s integrated firmware update utility provides a robust reset option.Though primarily for updating BIOS, it resets settings as part of a full flash cycle.
Best Practices: When and How to Reset ASUS BIOS Safely
Timing and intent define a successful BIOS reset. Only reset when configurations are intentionally altered, troubleshooting fails, or symptoms exceed manual fix thresholds. - Always double-check current BIOS settings before resetting, using the “Save” function or journaling feature.- Power off thoroughly—avoid restarting mid-reset. - Document post-reset behavior: boot time, stability, error codes. - If issues persist, revertといっても embedded solutions exist beyond reset—fan calibration, jumpers, or driver checks may follow.
A key insight: BIOS resets restore parameters, not fix underlying faults. Resetting should align with a broader system clean-up routine, especially after hardware replacement or performance tuning.
Troubleshooting: What If the Reset Doesn’t Work?
In rare cases, a BIOS reset fails to resolve instability.Persistent issues may stem from corrupted firmware, RAM faults, or hardware anomalies. Before concluding reset failure, verify: - CMOS battery health—replace if aged or leaking. - RAM integrity—run MemTest86 or ASUS Memory Support Tool.
- Power supply stability—use a valid PSU within rated specs. - Peripheral conflicts—disable non-essential drivers and prevent Boot Sequence interruptions. These checks ensure reset efforts are not delayed by overlooked variables.
Resetting an ASUS motherboard BIOS is more than a technical reset—it’s a critical maintenance tool that restores digital balance with precision and purpose. Whether executed via physical jumper, UEFI menu, or firmware utility, mastering these easy steps empowers users to reclaim control over their system’s core foundation. When approached methodically, a BIOS reset becomes a reliable safeguard against cumulative configuration drift and an efficient gateway to stable, lasting performance.
![[Motherboard]BIOS item-Restore AC Power Loss funct... - ASUS - ZenTalk ...](https://kmpic.asus.com/images/2023/02/10/ecc84beb-9cf0-4c1d-9166-31e88a36488c.bmp)

Related Post
Did Fwtinas Onlyfans Secretly Reveal This? Unveiling the Hidden Layers Behind Her Viral Scholarship Revelation

Sprite Challenge: The Ultimate Test of Reflexes, Strategy, and Skill
Inas X Biography Age Wiki Net worth Bio Height Boyfriend


