Mig Welding In Spanish: A Beginner’s Step-by-Step Guide to Mastering the Technique
Mig Welding In Spanish: A Beginner’s Step-by-Step Guide to Mastering the Technique
For anyone venturing into the world of metal fabrication, learning Mig welding—or Movimiento ingeschliffenes M_LOG Welding—offers a powerful gateway to precision, durability, and professional craftsmanship. This technique, renowned for its efficiency and clean seams, forms the backbone of modern industrial joining, yet its fundamentals remain accessible to dedicated beginners. This comprehensive guide unlocks the core principles, essential tools, and practical steps needed to start welding with confidence, transforming raw metal into solid, lasting structures.
Mig welding stands out as one of the most widely adopted arc welding processes, valued for its semi-automatic operation and consistent arc control. Originating from “Metal Inert Gas,” the process uses a continuous solid wire electrode fed through a welding gun, guarded by a shielding gas typically argon or a blend, which protects the molten weld pool from atmospheric contamination. “It’s the gold standard for both beginners and pros,” notes electrical engineer and welding specialist Carlos Reyes.
“Once you grasp the fundamentals, the repeatability and quality are unmatched.” But for newcomers, the leap into mobile equipment and wire feeding systems can seem daunting—until the right framework strips away complexity.
What Is Mig Welding? Core Concepts Every Beginner Should Know
Mig welding, short for Metal Inert Gas, is characterized by its ability to weld thick to thin metals with minimal spatter when executed properly.Unlike stick welding, which relies on a consumable electrode broken into fragments, Mig employs a continuous wire rod fed seamlessly from a spool. This process excels at producing smooth, high-integrity welds with excellent penetration, especially in positions that demand stability, such as flat or horizontal joints.
At its essence, Mig welding operates through three key components working in tandem:
- Wire Electrode: A consumable, continuously-fed filler rod made of steel alloys, coated with flux in some systems to enhance arc stability and weld quality.
- Shielding Gas: Protects the weld from oxidation and nitrogen absorption, critical for avoiding porosity and brittle joints. Argon is standard, but blends with carbon dioxide or oxygen are often used depending on the base metal.
- Power Source: A welder unit delivers consistent energy, regulating amperage and voltage to maintain a stable arc, often controllable via dials or digital panels.
The process begins by selecting matching electrode and gas types to the materials—steel, stainless steel, aluminum—ensuring compatibility and weld strength.
As the welder modulates the trigger, wire feed speed, and voltage, the arc melts both the base metal and filler, fusing layers while shielding the hot pool from air. This synergy enables clean, strong joints even in less-than-perfect conditions—making Mig one of the most forgiving automated processes for new operators.
Essential Tools and Equipment for Beginner Mig Welders
Starting with the right tools is non-negotiable in Mig welding, yet the initial investment can feel overwhelming. A well-organized kit ensures safety, control, and consistent results, empowering beginners to focus on technique rather than equipment troubleshooting.Here’s a breakdown of the core components you’ll need to begin:
- Mig Welder: Choose a unit rated for 120–240 volts with adjustable current (typically 50–300 amps), enough for sheet metal to structural steel.
Inverter-based models offer portability and efficiency.
- Welding Gun: Features an integrated trigger, nozzle for gas flow, and adjustable wire speed knob. The gun’s ergonomics directly affect control and fatigue.
- Shielding Gas Cylinder: A 20-lb cylinder suffices for most home and light workshop projects. Ensure cylinders are grounded and stored upright for safety.
- Auto Wire Feed System: A spool housing with consistent wire tension prevents jams and ensures uninterrupted welding—key for learning proper seam養护.
- Consumables: Stick electrode (for joint preparation), nozzle (replace every few months), Filler wire (past 6–12 months), appropriate cauterizing tip.
- Personal Protective Equipment (PPE): Welding helmet, flame-resistant jacket, gloves, and safety goggles protect against ultraviolet radiation, sparks, and intense heat.
Beginners often overlook PPE, assuming technical skill compensates for protection, but safety culture is foundational.
Experts stress: “You can’t learn effectively—or safely—without proper eye and respiratory protection.” Investing in a worthy helmet with variable shade ensures clear vision while blocking harmful radiation, preventing long-term eye damage.
Step-by-Step Beginner’s Guide to Starting Your First Mig Weld
Mastering Mig welding begins with structured practice, not just theory. A methodical approach builds muscle memory, reinforces safe habits, and fosters precision. Here’s a practical sequence to launch your journey:Step 1: Prepare the Workpiece Clear rust, oil, and paint from metal surfaces using wire brushes, grinders, or solvent cleaners—contaminants lead to weak welds.
Align joint edges tightly; even minor gaps compromise fusion. “Cleanliness is 90% of a strong weld,” emphasizes training specialist Elena Mendoza. She recommends using a V bevel for thicker metals to ensure full penetration.
Step 2: Set Up the Equipment Connect the wire spool to the welder using proper polarity (most Mig is DCEP—Direct Current Electrode Positive), feed wire speed low initially, and set shielding gas flow to 15–25 cubic feet per hour (CFH) at medium pressure.
Pre-load a short length of wire and test voltage settings on scrap metal to dial in stability.
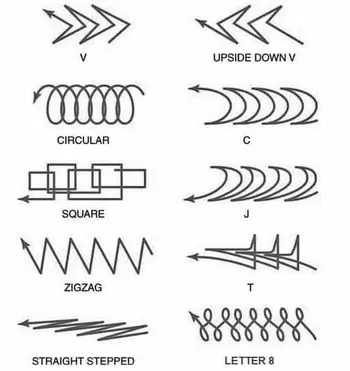
Step 3: Practice the Arc and Technique Hold the gun at a 15–25 degree angle, maintaining 1–2 inches from the joint. Trigger the machine intermittently to sustain a steady arc, moving steadily along the seam to avoid overheating or under-welding. Practice smooth, continuous passes—jerky motion risks spatter and inconsistent bead shape.
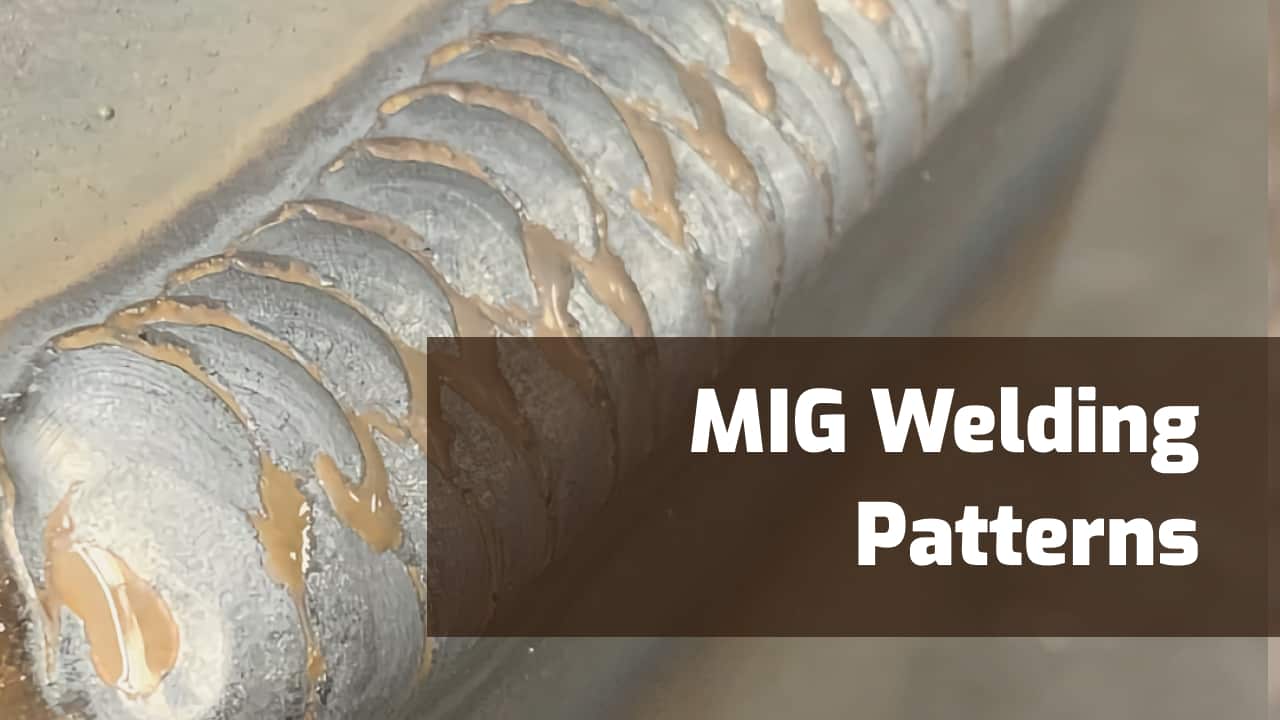
Step 4: Master Bead Geometry A well-executed weld features uniform height (typically 2–4 mm), no undercut, and spark-free transitions.
Start with short but consistent passes, gradually increasing length as you feel control. “Focus on speed and consistency before rushing volume,” advises Mendoza. “Slow, deliberate movements build reliability.”
Begin with simple joint types—butt, fillet, or corner—before progressing to complex assemblies.
Use a bead marker to maintain consistency in width and positioning. Weld in straight lines first, letting curves come later once fundamentals solidify.
Common Challenges and Tips for First-Time Welders
Even seasoned welders face hurdles, but newcomers must anticipate and address mistakes early to avoid damaging materials or reinforcing bad habits.One frequent issue is spatter—localized metal droplets ejected during welding.
It stems from incorrect amperage, dirty tips, or excessive gas flow. “Reduce voltage slightly and clean the gun nozzle immediately,” recommends welder-turned-instructor Luis Rivera. “Proper maintenance cuts spatter in half.”
Another challenge is penetration failure—too shallow a bead inadequate for load-bearing joints.
Beginners often underfeed the wire or ride too slow. Learning to gauge voltage and travel speed through practice on scrap material resolves this.
Porosity—tiny holes in welds from trapped gas—is usually caused by contaminated filler wire or shielding gas breakdown. Always inspect wire spools, store gas cylinders upright, and replace wire older than six months.
Ensure the shielding envelope remains unbroken by holding the gun at the correct distance and motion.
Finally, burn-through—melting through thin material—is common when amperage exceeds need. Control travel speed and wire feed: a steady, medium pace allows metal to flow without exceeding thermal limits. “Begin with low output and build up,” urges expert Javier Morales.
“Less is often more.”
Advanced Techniques and Expansion Opportunities
As basic skills stabilize, Migr welding opens doors to enhanced precision and versatility. Experienced beginners can explore variable voltage systems (V-V arcs), dual-shield processes (MIG with alternative gas mixes), and automated guide systems. These upgrades permit faster production in fabrication shops, shipbuilding, and automotive repair, where repeatability and quality are paramount.“Mig isn’t just for beginners—it evolves with your expertise,” says Rivera. “Cross-training in related techniques like C# (pulse Mig) or stainless steel welding accelerates mastery.”
Whether crafting custom frames, repairing industrial equipment, or pursuing fabrication certifications, Mig welding lays the foundation. Mastering its principles opens not just doors to hands-on jobs, but a path toward innovation and professional growth.
In essence, learning Mig welding in Spanish isn’t just about technique—it’s about building discipline, precision, and a career.
With patient practice, proper preparation, and a commitment to safety, even the most inexperienced welder can forge skill, strength, and lasting confidence—one bead at a time.


Related Post
Usa Jamestown: Unraveling the Complex Legacy of America's First Permanent English Colony
Argentina GDP: Navigating Decades of Volatility and Crisis
WWE Faces Big Issue In Holding PayPerView In Mexico
AEW Insisted Jacksonville Jaguars Cheerleaders Dance Sonny Kiss To The Ring Before TNT Title Match