How to Make a Paper Airplane: The Easy Step-by-Step Guide Every Beginner Needs
How to Make a Paper Airplane: The Easy Step-by-Step Guide Every Beginner Needs
Crafting a paper airplane that glides smoothly through the air doesn’t require advanced skills—just a simple sheet of paper and a methodical approach. This easy step-by-step guide transforms basic folding into a satisfying blend of precision and play, making it accessible for all ages. Whether you're introducing children to aerodynamics or revisiting childhood magic, mastering one fundamental design will elevate your flying game.
With minimal tools and clear instructions, anyone can launch a well-balanced, stable plane that soars with intention.
Start with the Right Foundations
The key to a successful paper airplane begins with selecting the ideal material and preparing your workspace. Use a standard 8.5 x 11-inch sheet of printer paper—its lightweight yet rigid structure supports controlled flight.Plain white or colored paper works equally well, offering both visibility and grip during folding. Before folding, place the paper on a flat surface, preferably smooth and free of wrinkles, to ensure precision in each crease. “Accuracy in folding directly correlates with flight performance,” notes aeronautics educator Dr.
Elena Marquez. A level surface also reduces accidental irregularities that could destabilize the plane in the air.
Step 1: Shape the Central Crease
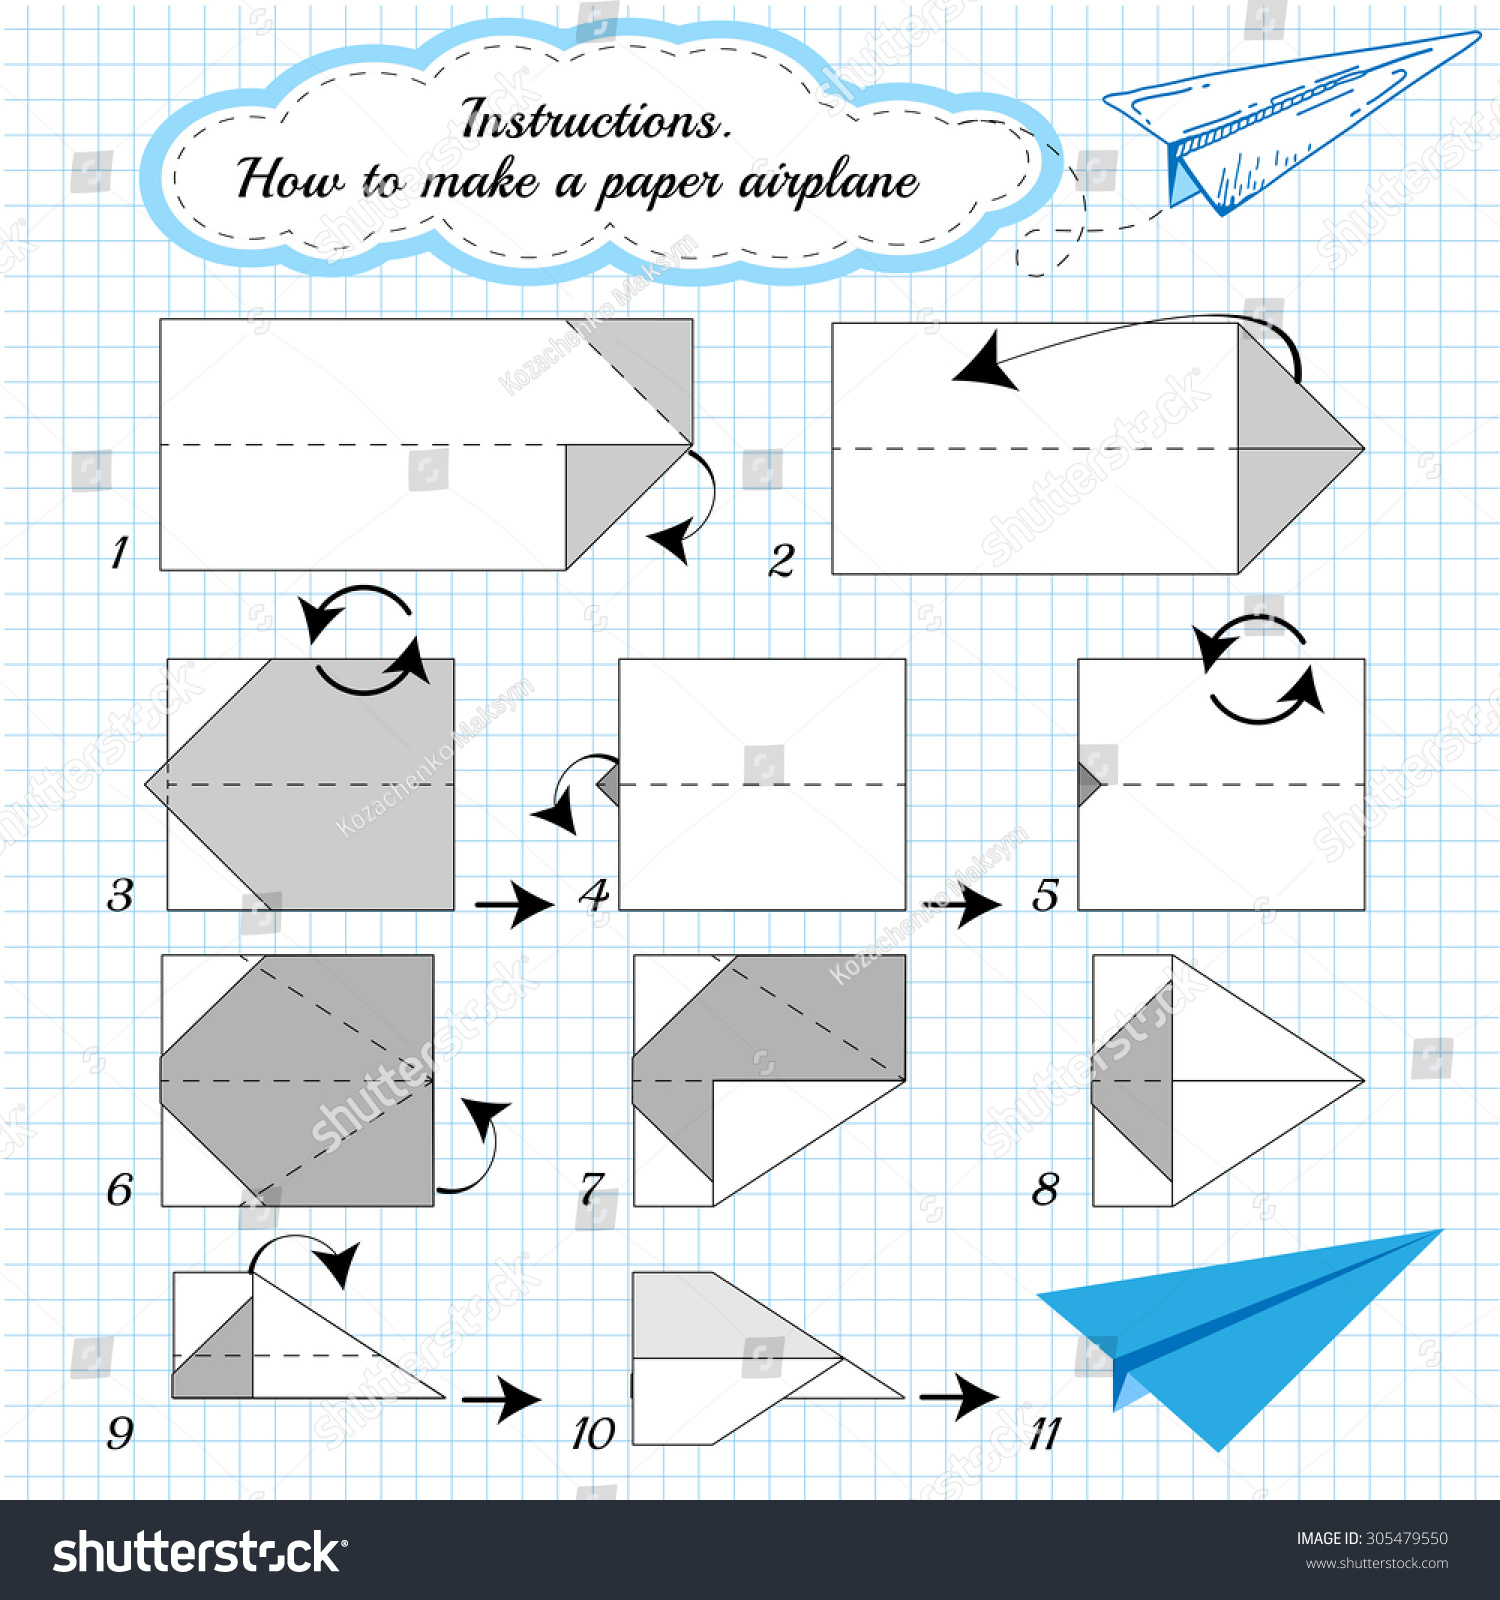
Begin the process by rotating the paper 90 degrees so it lies horizontally.Align the top and bottom edges to form a sharp vertical crease, pressing firmly with a ruler or edge of a pen. This central crease acts as the spine of the airplane, guiding symmetry in all subsequent folds. Once established, unfold the paper—this step is critical for establishing reference lines that prevent imbalance in later stages.
Conservation of form is essential: even a slight misalignment here can cause unintended drag.
Step 2: Fold the Nucleus Wings
Take the top two corners and fold each toward the central vertical crease, aligning their outer edges perfectly with the center line. The resulting diagonal creases form a neat triangle at the top, creating a balanced aerodynamic shape.Smooth out each fold with deliberate pressure to lock in clarity—audible “snap” signals proper crease formation. This triangular nose not only defines the plane’s front but also stabilizes forward motion. As noted in *Aerodynamics for the Curious Mind*, “Triangular leading edges minimize turbulence and enable smooth airflow”—a principle visible even in these simple folds.
Step 3: Refine the Nose and Body
With the nose firmly formed, fold the newly created top edges—now forming the trailing sides of the triangle—downward along the central crease to narrow the airplane. Crease firmly and fold symmetrically to maintain balance. Next, fold the entire structure in half along the vertical spine, bringing the two halves together so the folded edges align perfectly.This double-fold core reinforces structural integrity and further concentrates weight at the front, enhancing launch stability.
Step 4: Shape the Longitudinal Wings
Now, fold each side outward from the center, angling the edges downward to form the primary wings. Maintain a consistent 1.5- to 2-inch gap between the folded edges and the central spine—deviations here affect lift and stability.The wings should extend horizontally, parallel to the base, creating a streamlined silhouette. Avoid overshooting the desired span; a wingspan around 60% of the paper’s width optimizes flight time and control. “Controlled extension of the wings maximizes surface area without overloading the structure,” explains Dr.
Marquez, emphasizing the balance required.
Step 5: Finish with Tail and Target Adjustments
To stabilize in-flight behavior, fold each wingtip downward slightly—just one-third of an inch—to form a subtle vertical stabilizer. This small modification prevents unintended spins and improves directional control.Test the plane by gently launching it at a 45-degree angle from shoulder height. If it dives, adjust the tail fins upward; if it rolls, check wing symmetry. Minor tweaks—like slight upward bends at the wingtips—can refine flight path and extend distance.
These iterative adjustments embody the iterative spirit of design, transforming a simple fold into an optimized flying vehicle.
Pro Tips for Longer, Smarter Flights
- **Paper choice matters**: Slightly textured or slightly heavier stock resists wrinkling mid-flight and enhances glide. - **Clean creases** are non-negotiable—running a ruler helps lock precise angles.- **Launch gentle**: Avoid forceful throws; a smooth, level toss maximizes airfoil efficiency. - **Experiment deliberately**: Adjust wing angles or tail height to fine-tune performance based on paper type and environment.
Final Thoughts: Where Simplicity Meets Flight
Mastering the paper airplane is more than a craft—it’s an introduction to the physics of flight.By following these straightforward steps—from central crease creation to final wing refinement—one produces a functional, stable glider capable of sustained, controlled movement. The beauty lies in simplicity: clear instructions, no tools beyond paper, and immediate feedback on each fold’s impact. Whether inspiring young minds or satisfying a lifelong curiosity, building a paper airplane proves that innovation often begins not with complexity, but with a single, deliberate crease.


Related Post
Shannyn Sossamon Husband Unveiled: A Deep Dive into the Actress's Private Relationships and Personal Milestones
Cyberpowerpc Model C Series: A Deep Dive into Gaming Performance and Features
Unveiling the Operation of the Web Scraper
LaQuan Smith Fashion Designer Bio Wiki Age Wife and Net Worth


