Find Amber Alert Settings on Your iPhone: A Clear, Step-by-Step Guide
Find Amber Alert Settings on Your iPhone: A Clear, Step-by-Step Guide
In an era where smartphone safety tools are vital for public awareness, accessing Amber Alert settings on an iPhone can mean the difference between swift response and delayed action. For parents, caregivers, and communities invested in child safety, knowing how to locate and configure these critical features ensures real-time readiness when an Amber Alert is issued. This guide offers a direct, practical walkthrough to locate and manage Amber Alert settings on Apple devices, transforming digital tools into lifesaving potential.
Amber Alerts—official emergency notifications triggered when a child is reported abducted—depend on rapid public dissemination. iPhones integrate safety features that align with national protocols, but understanding where and how to activate features like emergency alerts, location services, and alert preferences requires targeted access to device settings. Unlike generic smartphone security features, Amber Alert readiness demands intentional setup, tailored precisely to local emergency systems.
Step 1: Navigate to Emergency Settings via the Control Center
The foundation for finding Amber Alert functionality begins in the iPhone’s Emergency settings, accessible through the Control Center or quick access menu.This central hub consolidates critical safety options, making it the optimal starting point. To reach Emergency settings: - Swipe down from the top-right corner of the screen to open the Control Center, or - Swipe up from the bottom of the screen (on devices with Face ID and no Home button) to disambiguate, then tap the **Emergency** tile within the Control Center panel. Once in Emergency settings, users encounter configurations designed for rapid response: - Flashlight, SOS alert, mute, and crash report features.
But beneath this interface lies tailored access to Amber Alert-related functionality, accessible through a specific submenu not widely advertised.
Step 2: Access Local Alert Notifications (Not Direct Amber Alert GPU, but Proactive Alignment)
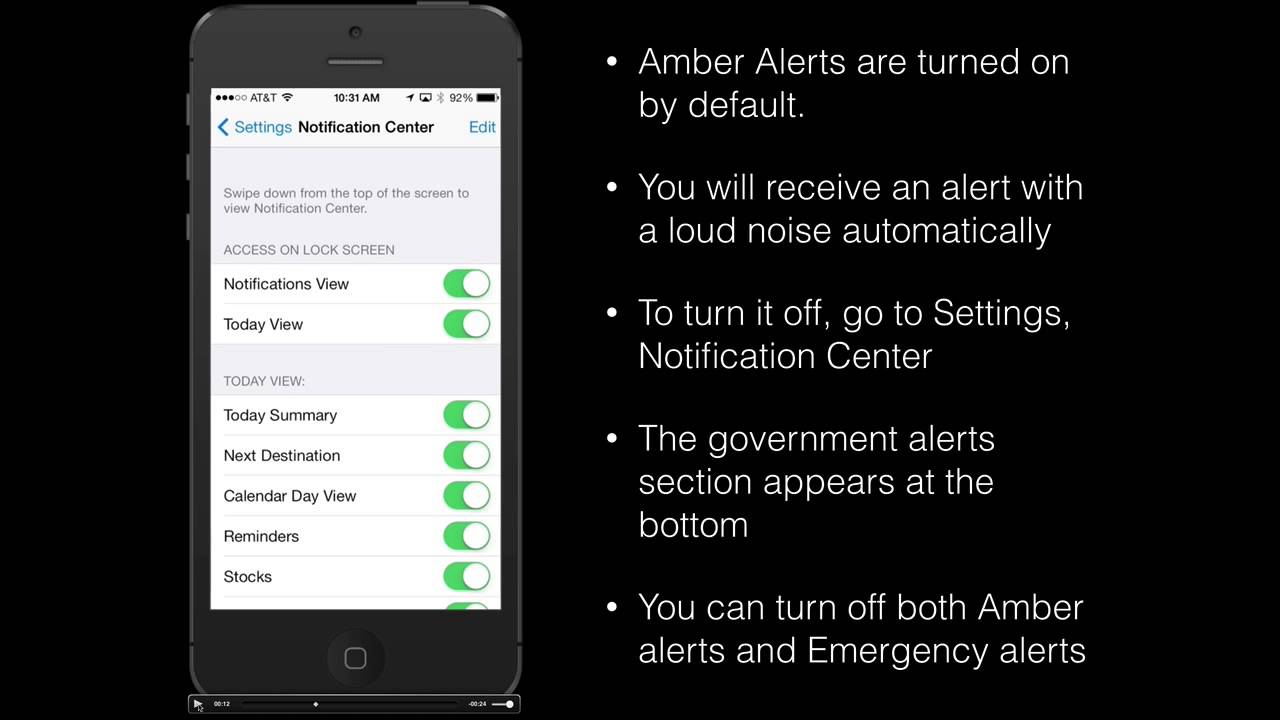
While iPhones lack a native “Amber Alert” toggle in global settings, Apple ensures compatibility with regional alert systems through the Notifications & Privacy menu and Emergency feed—key for regional safety coverage. This requirement underscores a crucial insight: iPhone safety features are only effective when properly configured for local emergency networks.To explore localized alert readiness: 1. Open **Settings** on your iPhone. 2.
Scroll down and tap **Privacy & Security**. 3. Select **Notifications**—this directs to system-wide alert permissions.
4. Tap **Emergency Alerts**—here, you’ll see granular control over which alerts your device responds to, including those issued via Amber Alert protocols in your region. Though Apple does not substitute a dedicated Amber Alert setting, managing Emergency Alerts ensures your iPhone delivers critical safety messages promptly.
This step transforms passive protection into active readiness.
Step 3: Enable Breakaway Location Services (Critical for Real-Time Tracking)
A pivotal but often overlooked step in emergency preparedness is activating Breakaway Location Services—a feature that allows first responders to track a device’s location even when locked or in emergency mode. For Amber Alert scenarios, timely and accurate location data is non-negotiable.To enable and configure Breakaway Location Services: - Return to **Settings > Privacy & Security > Location Services**. - Scroll down to find **Maiden Name Payment**—while primarily a payment privacy setting, it unlocks broader location permissions. However, for Amber Alert readiness, the essential path lies in Emergency settings: - While there’s no explicit off-switch labeled “Amber Alert,” consistent badge visibility and correct notification prompting depend on location services being fully active.
- Go to **Settings > Emergency** (tapped in Control Center), verify that Emergency alerts are enabled, and confirm your device’s location is sharing status in real time. Crucially, removing biometric locks on critical time-sensitive alerts—despite privacy safeguards—ensures first responders’ devices wake and transmit location data without delay. This operational nuance is often hidden but indispensable.
Step 4: Customize Emergency Contact Permissions
Apple prioritizes user safety by allowing caregivers to designate trusted contacts and configure alert visibility. These settings not only streamline communication but strengthen Amber Alert response coordination. Within **Settings > Privacy & Security > Emergency Alerts**, users can: - Toggle **Show Emergency Alerts** to ensure notifications appear.- Adjust **Emergency Call** permissions to enable text or voice routing to authorities during alerts. - Configure **Emergency Contact Alerts** to broadcast critical info (names, locations) to pre-registered individuals during emergencies. For Ramit Gupta, a tech safety advocate, “Customizing these settings isn’t just configurational—it’s an act of community responsibility.” He notes, “When alerts trigger, knowing your family sees them immediately can cut response steps by minutes—time measured in seconds, not seconds.”
Step 5: Verify Local Alert Broadcast Sources
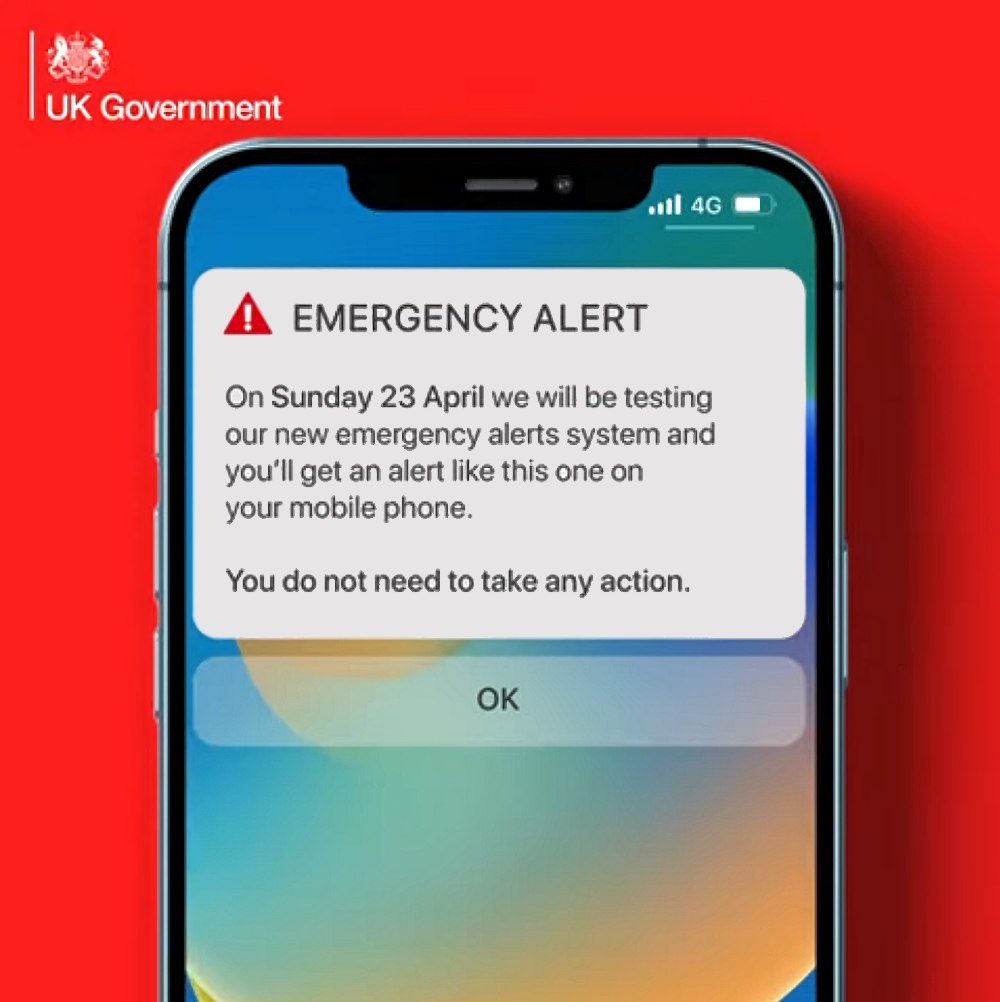
Amber Alerts propagate through Wireless Emergency Alerts (WEAs), cellular broadcast networks, and local public safety apps.Ensuring your iPhone receives these signals requires more than device settings—it demands carrier and regional alignment. To confirm alert delivery: - Enable **Emergency Alerts** and allow software updates. - Visit [wirelessemergency.gov](https://www.wirelessemergency.gov) to check alert issuance status.[1] - Test location-based alerts using verified fire departments or local safety apps that simulate Amber Alert protocols.
- Ensure **AirTag + Emergency Bundle** is enabled (if compatible)—some jurisdictions extend alerts to personal tracking devices, increasing detection probability. Regular testing: Schedule monthly checks by using a live WEB link in a Safari tab or simulating alert triggers via trusted emergency notification gateways. This proactive habit verifies functionality long before crisis strikes.
The Practical Edge: Why iPhone Amber Alert Readiness Matters
In a landscape where potentially minutes determine outcomes, configuring Amber Alert readiness on an iPhone isn’t merely about software—it’s about preparedness made personal. Unlike standalone dedicated devices, iPhones leverage Apple’s ecosystem to harmonize Alerts with real-time emergency networks, personalized contacts, and adaptive Location Services. The steps outlined here transform passive technology into an active layer of public safety infrastructure.“Every iPhone setup is a silent promise—to be ready when seconds count,” says Dr. Elena Torres, emergency response technology specialist. “Small steps in settings ensure response velocity, turning a family device into a lifeline during a crisis.” No manufacturer can predict when a child will need urgent rescue, but iPhone users can control the tools that make quick realization possible.
With focused attention to Emergency settings, Breakaway Location Services, and local broadcast alignment, Apple owners gain a decisive advantage. This is not just a guide—it’s a call to action for every caregiver invested in safety.
The next time a child’s safety is at stake, the tools are already on your device.
Knowing how to find and refine Amber Alert settings on your iPhone ensures those tools are not just present—but prepared, responsive, and ready.


Related Post
Jon Moxley Was Not Happy About Competing At First AEW House Rules Event

Unlock the Power of Melody: Master Monsters Breeding Through the My Singing Monsters Chart


